Mastering French Bread

French bread; it's the perfect accompaniment to nearly any entrée, makes wonderful French toast, or any number of sandwiches. And though it can be bought from bakeries, there's nothing like a crusty, warm loaf straight from your own oven. Here is the recipe that I have worked on perfecting over the past few years, and it's something that is simple enough for any baker. Not only the pleasure of eating, but the satisfaction of having made it yourself. And that will make anything taste better.

Here is the dough recipe that I have created, using Julia Child's as my basic and altering it to suit my taste. This recipe makes two large loaves, approximately two feet long each. If you don't want to make that much bread, you can easily cut it in half.
French Bread
5 teaspoons yeast
2/3 cup lukewarm water (no hotter than 110 degrees)
1/2 teaspoon sugar
7 cups all-purpose flour
1 1/2 teaspoons salt
2 tablespoons whole wheat flour
1 cup cold water, plus about 1/3 extra
Add yeast to 2/3 cup warm water and stir to dissolve yeast. Sprinkle with sugar and let sit for five minutes or until foamy to make sure that yeast is active. In a large bowl, combine flours and salt and stir together. Add one cup cold water to yeast mixture and slowly combine with flour. Continue to add water by the tablespoon if it is too dry, or small additions of flour if the dough is too wet. When it is combined, the dough will have a ragged look but don't worry! You'll soon work that out with a little bit of elbow grease.
The French method of bread making requires no oil, for the dough, the rising, or the kneading. The idea behind not oiling the rising bowl is that the dough needs a firm seat to push up off, so don't be tempted to. There may be little bits of dough that stick to the sides of the bowl, but you can just remove these by hand and reincorporate it.
Kneading
Turn it onto a floured surface and knead for a couple of minutes, or until all the flour is combined, then let sit for about five minutes to allow gluten to relax. Knead again, about fifty turns, and again allow it to rest for about two minutes. For the final kneading, give the dough about thirty turns until it feels completely smooth and elastic, or passes the windowpane test. At this stage the dough shouldn't stick to your hands as you knead, but if you pinch it tightly, it should stick to your fingers.

First Rising
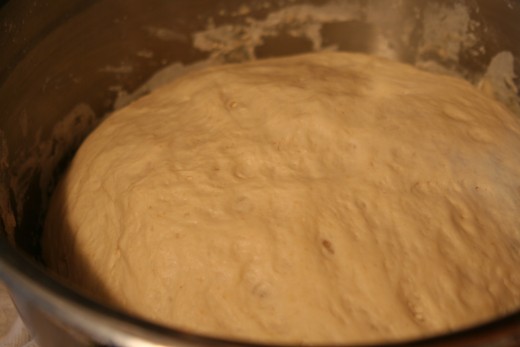
Take thoroughly kneaded dough and place in a clean bowl with no oil. Cover with plastic wrap or a clean towel and set in a warm, dry place for 45 minutes to an hour, or until it has at least doubled in size. The dough with be very soft and full of air bubbles.


Second Rising
After the first rising is complete, punch it down and remove from bowl to a floured surface. With your hand, press into a rectangle about 14-16 inches long, and fold over into thirds. This will re-distribute the yeast and make for a more even rising. Replace in bowl, folded side down, and cover again. Let rise for for two and a half to three hours, or until it's one and a half to two times it's original size. With this rise, size is more important than time. Once this rise has completed, the dough is ready to shape!
Shaping the Loaves
Learning to shape the loaves correctly is one of the most important elements of successful French bread, but once you figure it out, it's really not that hard. If you're not comfortable with leaving it to hold it's own shape, you can invest in a french bread pan that will ensure loaves that are round.
Make sure that your surface is floured well enough that the dough doesn't stick to the counter, but not so much that it will absorb too much of it and become dry. To shape, divide the dough in half. Put one half on the counter and firmly press into a twelve inch rectangle. Being a little bit rough with it at this stage reactivates the gluten and yeast, so don't be afraid to to be firm. Fold it over and with the heel of your hand press the edges to seal it. Fold it in half again and press the edges. Now, roll it into the shape of a short fat loaf, and with the heel of your hand, pound a trough down the center. Roll onto it's side, and pound the edges shut. Repeat this step, and you're almost done! Simply tuck the ends under and pinch dough into place to insure nice, rounded heels on the loaf. If it is still somewhat too short and fat for what you are wanting, simply pick up the loaf and gently let one end fall so that it will stretch out. This is a good way to work out any unevenness in the loaf.


Final Rise
After you are happy with the shape, place loaf on a lightly floured, clean towel and gently fold sides over the top to keep the dough from drying out. Let it rise until doubled, and then it's ready to bake!

Baking the Bread
Preheat oven to 400 degrees. If you have a baking stone (or a couple of hardware tiles-- I have used these for years and they work very well), put them in and let the heat with the oven, though it will take a bit longer with the stones. If you don't have them, a metal baking sheet or the French bread pans will work too.
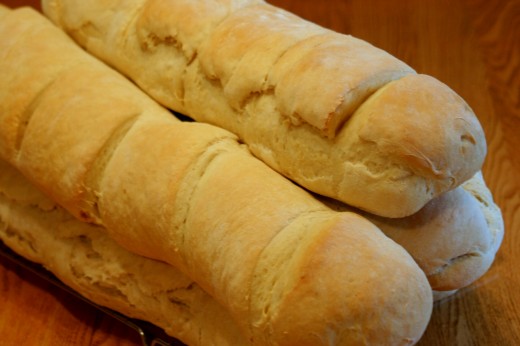
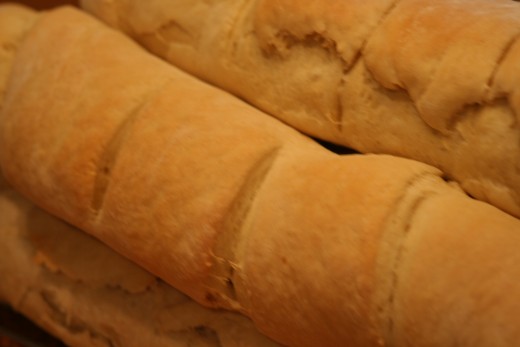
After oven is heated, gently lift the loaves from the towels and carefully place on the stones in the oven. With a very sharp blade, slit the loaf on the diagonal four of five times down the length of the bread. Bake for 15 minutes, then reduce oven temperature to 350 degrees and bake for another 15 to 20 minutes or until internal temperature reads 180 degrees. Remove from oven and place on cooling rack.
Bon Appetit!
Now it's ready to enjoy! It's incredible fresh from the oven with butter, or you can mix butter with freshly crushed garlic and spread on sliced bread. Put on a baking tray, and place under broiler until toasted golden brown.


")